


Not only will I teach you GraphQL in this article, but I’ll also walk you through the thrilling process of creating a custom ToDo application from scratch. We’re going straight into real-world development — where the rubber hits the road — instead of the usual “Hello World” examples and drab introductions. You’ll not only comprehend GraphQL by the end of this journey, but you’ll also have a working ToDo app to show for it.
As we investigate GraphQL’s superpowers, set up our development environment, and start building a strong, adaptable, and dynamic ToDo application, buckle in. This is not your typical tech tutorial; rather, it is an exploration of web development in the future. Let’s change your work list, one GraphQL query at a time, from disorder to clarity. But let’s talk about the Elephant in the room first — GraphQL.
What is GraphQL?
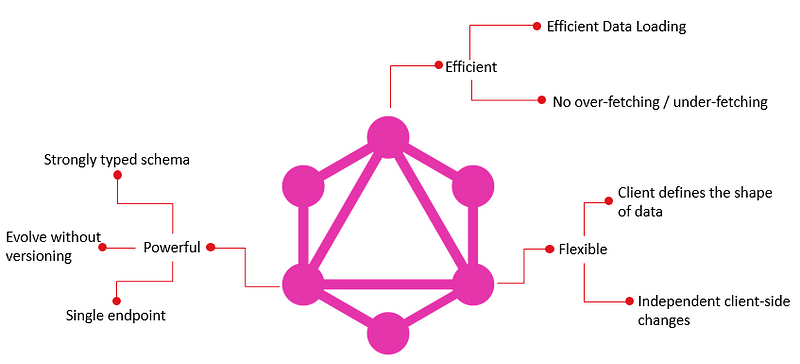
Traditional REST APIs have long served as the foundation of web applications, but they have several drawbacks. Over- or under-fetching of data, when you either get more or less data than you require, is a typical problem. Both the performance of your application and the user experience may be hampered by this inefficiency.
Contrarily, GraphQL offers a precise and adaptable method for data retrieval. GraphQL lets you simply request the data you need, no more and no less, as opposed to preset endpoints. GraphQL is a great option for contemporary, data-driven applications since it allows you to customise your queries to meet certain demands.
Key Concepts and Features
Before getting started on creating our practical ToDo application, let’s quickly go over some fundamental GraphQL ideas and features:
1. Schema: The foundation of GraphQL is a schema, which outlines the organisation of your data. Types, queries, and mutations make up this entity. Data is retrieved using queries, represented by types, and modified using mutations.
2. Flexibility: The schema of GraphQL is naturally adaptable, making it simple for you to meet changing requirements. Existing customers won’t be impacted by the addition or modification of types and fields.
3. Precise Queries: GraphQL enables you to make precise data requests, preventing over- and under-fetching problems. Performance is enhanced and needless data transfer is decreased as a result.
4. Strongly Typed: GraphQL is strongly typed, meaning that the types of data returned by queries are well-defined. This ensures data consistency and enables tools to provide auto-completion and validation.
5. Real-time Data: GraphQL supports real-time data with subscriptions, allowing clients to receive updates when data changes.
Our Project: A Real-World ToDo Application
In this article, You’ll learn how to set up the project environment, define a GraphQL schema, connect to a database, implement resolvers, and test your application. By the end of this tutorial, you’ll not only have a working ToDo app but also a solid understanding of GraphQL and its practical applications.
Technologies We’ll Use
To accomplish this, we’ll be utilizing the following technologies:
Node.js: The JavaScript runtime for building our server.
Apollo Server: A powerful library for creating a GraphQL server in Node.js.
MongoDB: A NoSQL database for storing our ToDo data.
Mongoose: An ODM (Object Data Modeling) library for MongoDB, simplifying database interactions.
Nodemon: A tool for automatically restarting our server during development.
Setting up the Project
We’ll build the framework for our GraphQL ToDo application in this part. We’ll go over how to set up a development environment, configure the initial folder layout, and set up project dependencies.
Prerequisites
Before we begin, ensure you have Node.js installed on your machine. If you haven’t already, download and install Node.js from nodejs.org.
Creating the project directory
Let’s start by creating a project directory and navigating into it:
mkdir graphql-todo-app
cd graphql-todo-app
Initializing a Node.js Project
Initialize a Node.js project by running the following command:
npm init -y
This command will generate a package.json file where you can manage your project's dependencies.
For our GraphQL ToDo application, we’ll need a few dependencies. Let’s install them:
npm install apollo-server mongoose graphql dotenv nodemon
To run Nodemon on our code, we need to add a script to our package.json file. The scripts section of the package.json file defines some commands that we can run using npm. For example, we can add the following scrip
"scripts":
  "start": "nodemon src/index.js"
}
The start script runs nodemon with src/index.js as the entry point of our app. To run this script, we can use the npm run command followed by the name of the script. For example, to start our server in development mode, we can run:
npm run start
Folder Structure
Now that we have installed and configured the dependencies and tools for our project, we can create the folder structure for our code. We can create a src folder in the root directory of our project and inside it, we can create three subfolders:
models
schemas
resolvers
The models folder will contain the Mongoose models for our data. The schema folder will contain the GraphQL schema for our app. The resolvers folder will contain the GraphQL resolvers for our queries and mutations. We can also create an index.js file in the src folder, which will be the entry point of our app.
The index.js file can look like this:
const { ApolloServer } = require("apollo-server");
const mongoose = require("mongoose");
const dotenv = require("dotenv");

// load environment variables
dotenv.config();

// import schema and resolvers
const typeDefs = require("./schema/index.js");
const resolvers = require("./resolvers/index.js");

// create Apollo Server instance
const server = new ApolloServer({
  typeDefs,
  resolvers,
});

// connect to MongoDB
mongoose
  .connect(process.env.MONGO_URI, {
    useNewUrlParser: true,
    useUnifiedTopology: true,
  })
  .then(() => {
    console.log("Connected to MongoDB");
    return server.listen();
  })
  .then(({ url }) => {
    console.log(`Server ready at ${url}`);
  })
  .catch((error) => {
    console.error(error);
  });
These modules, including Apollo Server, Mongoose, and Dotenv, are imported by this file. Furthermore, it imports the resolvers and schema that we will define later. Then, it offers the typeDefs and resolvers as choices when creating an Apollo Server instance. Additionally, it uses the MONGO_URI environment variable, which we will later add in a.env file, to connect to MongoDB. The server is then started, and the URL where it is operating is logged. It also deals with any mistakes that might be made throughout the procedure.
Create a file called .env in the project’s root directory, then add the following line to configure the .env file:
MONGO_URI="YOUR LOCAL MONGO DB OR CLUSTER CONNECTION STRING"
This sets the MONGO_URI variable to the connection string of our local MongoDB database named todo-app. You can change this value according to your own database configuration.
Creating the GraphQL schema
The GraphQL schema is the core of our app, as it defines the types, queries, and mutations that we can use to interact with our data.Schema Definition Language (SDL), a straightforward and declarative language for describing the structure and capabilities of our data, is used to write the schema.
The following code is for index.js in the src/schemas folder in order to create the GraphQL schema for our app:
// import the gql function from apollo-server
const { gql } = require("apollo-server");

const typeDefs = gql`
  # define a custom scalar type for Date
  scalar Date

  # define an enum type for task status
  enum Status {
    TODO
    DOING
    DONE
  }

  # define a type for Task
  type Task {
    id: ID!
    title: String!
    description: String
    status: Status!
    dueDate: Date!
  }

  # define the root query type
  type Query {
    # get all tasks
    tasks: [Task!]!

    # get a single task by id
    task(id: ID!): Task
  }

  # define the root mutation type
  type Mutation {
    # create a new task
    createTask(title: String!, description: String, status: Status): Task!

    # update an existing task by id
    updateTask(id: ID!, title: String, description: String, status: Status): Task!

    # delete an existing task by id
    deleteTask(id: ID!): Task!
  }
`;

// export the schema
module.exports = typeDefs;
The gql function from apollo-server, a helper function that converts the SDL string into a GraphQL schema object, is imported in this code. The schema is then defined using the gql template literal, a unique syntax that enables us to write SDL inside JavaScript.
The schema is divided into several components:
A unique scalar type that represents a date value is the scalar Date type. These fields of our tasks’ createdAt and updatedAt attributes will be stored and returned using this type. Later on, we’ll also need to develop a special resolution for this type.
The potential status values of our tasks are represented by the enum Status type, which is an enumeration type. The enum values are capitalized by convention.
The kind In our programme, a task entity is represented by a task type, an object type. It has a number of attributes that list a task’s characteristics, including id, title, description, status, createdAt, and updatedAt. There is a type for each field, and an optional exclamation point (!) designates whether the field is necessary or not. For instance, while the description field is optional, the id field is of type String and is of type ID.
The type Query type is the root query type that defines the entry points for fetching data from our app. It has two fields: tasks and task. The tasks field returns an array of Task objects, while the task field returns a single Task object by id. The array and object types are wrapped with square brackets ([ ]) and exclamation marks (!) to indicate that they are non-null types, meaning that they cannot return null values.
The type Mutation type is the root mutation type that defines the entry points for modifying data in our app. It has three fields: createTask, updateTask, and deleteTask. Each field takes some arguments that specify the input data for creating, updating, or deleting a task. Each field also returns a Task object that represents the result of the operation.
Exploring Input Types, Enums, Scalars, etc
GraphQL offers a range of types beyond just string and integer. Input types allow us to bundle multiple inputs into a single object, which is particularly handy when dealing with complex mutations. Enums restrict a value to a set of predefined constants, enhancing reliability. Scalars represent primitive values and can be extended to support custom types. We’ll leverage these advanced types to create a rich and expressive schema.
- Input types: We can use the
inputkeyword to define an input type, which is similar to a regular object type but can only be used as an argument for queries and mutations. For example, we defined two input types for creating and updating tasks, which contain the fields that we want to pass as inputs. We can then use these input types as arguments for our mutations, as shown below:
# Example mutation for creating a task using an input type

mutation {
  createTask(input: {
    title: "Write an article"
    description: "Write an article about GraphQL"
    status: TODO
    dueDate: "2023-10-31"
  }) {
    id
    title
    description
    status
    dueDate
  }
}
- Enums: We can use the
enumkeyword to define an enum type, which is a set of named constants that can be used as values for a field. For example, we defined an enum type for task status, which has three possible values: TODO, DOING, and DONE. We can then use this enum type as the type for our status field in our task type, as shown below:
# Example query for fetching tasks by status using an enum type

query {
  tasks(status: DOING) {
    id
    title
    status
  }
}
- Scalars: We can use the
scalarkeyword to define a scalar type, which is a primitive value that can be serialized and deserialized by GraphQL. GraphQL provides some built-in scalar types, such as String, Int, Float, Boolean, and ID. We can also define our own custom scalar types by providing a name and implementing the logic for parsing and serializing them. For example, we defined a custom scalar type for date, which can be used as the type for our dueDate field in our task type, as shown below:
# Example query for fetching tasks by due date using a custom scalar type

query {
  tasks(dueDate: "2023-10-31") {
    id
    title
    dueDate
  }
}
Using Tools to Test Your Schema and Queries
Testing is crucial in ensuring that our schema works as expected. Tools like [GraphQL Playground] and [GraphiQL] provide user-friendly interfaces for executing and debugging our queries and mutations. By using these tools, we can validate our schema, observe how queries perform, and troubleshoot any issues that arise.
To use GraphQL Playground, we need to install the apollo-server-express package, which is a variant of Apollo Server that works with Express, a popular web framework for Node.js. We also need to install the express package itself.
Connecting to Database
Connecting the App to MongoDB using Mongoose
To store our tasks, we’ll use MongoDB. MongoDB is a NoSQL database that stores data in flexible, JSON-like documents. Connecting our app to MongoDB is a breeze with Mongoose. Mongoose is an object data modeling (ODM) tool that simplifies MongoDB interactions by providing an easy-to-use API and out-of-the-box facilities for schema definitions, validations, and lifecycle hooks. We’ll set up a connection to MongoDB via Mongoose and use it to interact with our database throughout our app.
To connect to MongoDB using Mongoose, we need to install the mongoose package, which we already did in the previous section. Next, we need to import the mongoose module in our index.js file and use the connect method to establish a connection to our database. We can pass some options to the connect method to configure the connection settings, such as the URL of our database, the name of our database, and some flags to avoid deprecation warnings. We can also add some event listeners to handle connection events, such as open, error, and close. Here is an example of how to connect to MongoDB using Mongoose:
// index.js

import mongoose from 'mongoose';

// Connect to MongoDB using Mongoose
mongoose.connect('YOUR MONGO_URI', {
  useNewUrlParser: true,
  useUnifiedTopology: true,
  useFindAndModify: false,
});

// Get the connection object
const db = mongoose.connection;

// Handle connection events
db.on('open', () => {
  console.log('Connected to MongoDB');
});

db.on('error', (err) => {
  console.error('Connection error:', err);
});

db.on('close', () => {
  console.log('Disconnected from MongoDB');
});
Creating Data Models with Schemas and Validations
Data models represent the objects in our application, and their relations to each other. With Mongoose, we define our models using schemas. A schema maps to a MongoDB collection and defines the shape of the documents within that collection. We’ll create a Task model with fields for title, description, status, and due date. We can also add validations to our schema to ensure data integrity.
To create a schema using Mongoose, we need to import the Schema class from mongoose and use it to create a new instance of Schema. We can pass an object as an argument to the Schema constructor, which contains the properties and options for each field in our schema. For example, we can specify the type, required, default, enum, and validate options for our fields. Here is an example of how to create a schema for our Task model:
// models/task.js

import mongoose from 'mongoose';

const { Schema } = mongoose;

// Create a schema for Task model
const taskSchema = new Schema({
  title: {
    type: String,
    required: true,
    trim: true,
  },
  description: {
    type: String,
    trim: true,
  },
  status: {
    type: String,
    required: true,
    enum: ['TODO', 'DOING', 'DONE'],
    uppercase: true,
  },
  dueDate: {
    type: Date,
    validate: {
      validator: (value) => value >= Date.now(),
      message: (props) => `${props.value} is not a valid due date`,
    },
  },
}, {
  timestamps: true,
});
To create a model using Mongoose, we need to use the
modelmethod on themongoosemodule and pass the name of our model and the schema as arguments. The name of our model will be used as the name of our collection in MongoDB. Themodelmethod will return a constructor function that we can use to create instances of our model. We can also use this function to perform static methods on our model. Here is an example of how to create a model for our Task schema:
// models/task.js

import mongoose from 'mongoose';

const { Schema } = mongoose;

// Create a schema for Task model
const taskSchema = new Schema({
  // ...
});

// Create a model for Task schema
const Task = mongoose.model('Task', taskSchema);

export default Task;
CRUD Operations with Mongoose Methods
To perform CRUD operations using Mongoose methods, we need to import our Task model in our resolvers/index.js file and use it to implement the logic for our queries and mutations. We can use the async/await syntax to handle asynchronous operations and use the try/catch blocks to handle errors. Here is an example of how to perform CRUD operations using Mongoose methods:
// resolvers/index.js

import Task from '../models/task';

const resolvers = {
  Query: {
    // Fetch all tasks
    tasks: async () => {
      try {
        const tasks = await Task.find();
        return tasks;
      } catch (err) {
        console.error(err);
        throw err;
      }
    },

    // Fetch a task by id
    task: async (parent, args) => {
      try {
        const { id } = args;
        const task = await Task.findById(id);
        return task;
      } catch (err) {
        console.error(err);
        throw err;
      }
    },
  },

  Mutation: {
    // Create a new task
    createTask: async (parent, args) => {
      try {
        const { input } = args;
        const task = new Task(input);
        await task.save();
        return task;
      } catch (err) {
        console.error(err);
        throw err;
      }
    },

    // Update an existing task
    updateTask: async (parent, args) => {
      try {
        const { id, input } = args;
        const task = await Task.findByIdAndUpdate(id, input, { new: true });
        return task;
      } catch (err) {
        console.error(err);
        throw err;
      }
    },

    // Delete an existing task
    deleteTask: async (parent, args) => {
      try {
        const { id } = args;
        await Task.deleteOne({ _id: id });
        return true;
      } catch (err) {
        console.error(err);
        throw err;
      }
    },
  },
};

export default resolvers;
By using these methods, you can easily create, read, update, and delete data in your MongoDB database.
Implementing Resolvers for Your Queries and Mutations
Writing Resolvers to Fetch and Manipulate Data
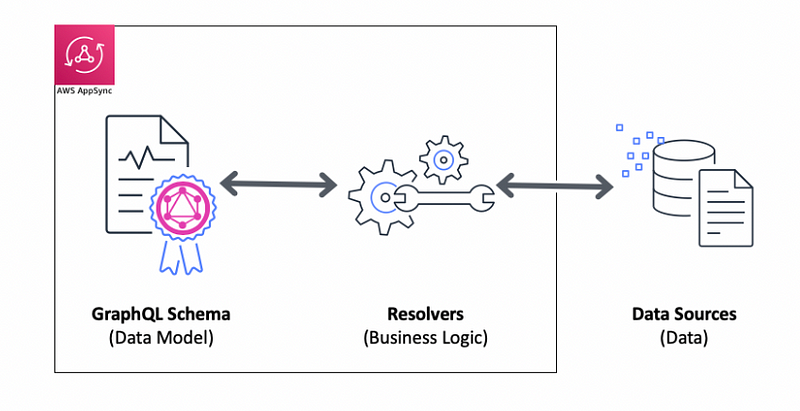
Resolvers are the functions that connect our GraphQL schema to our data sources. They determine how to get the data for each field in our queries and mutations. We can also pass arguments to our resolvers, which let us customize our data requests based on the client’s input. For example, we can filter, sort, or paginate our data using arguments. We can access the arguments in our resolvers as the second parameter, which is an object that contains the values of the arguments.
Using Context to Share Common Information Across Resolvers
Sometimes, we need to share some information that is relevant to all our resolvers, such as the current user, the database connection, or some helper functions. We can use the context parameter to pass this information to our resolvers. The context parameter is the third parameter of our resolvers, which is an object that is created by a function that we define when we create our Apollo Server instance. We can access any property of the context object in our resolvers.
Handling Errors and Reporting Them to the Client
Errors are inevitable in any application, and we need to handle them gracefully and inform the client about what went wrong. GraphQL has a built-in way of reporting errors to the client, which is an array of error objects that are returned along with the data. Each error object has a message property that describes the error, and optionally other properties that provide more details. We can throw errors in our resolvers using the ApolloError class or its subclasses, which are provided by Apollo Server. We can also customize the error messages and codes according to our needs.
Check below example for reference
// resolvers/index.js

import { ApolloError } from 'apollo-server';

const resolvers = {
  Query: {
    // Fetch all tasks
    tasks: async (parent, args, context) => {
      try {
        // Get the database connection from context
        const { db } = context;

        // Get the filter, sort, and limit arguments from args
        const { filter, sort, limit } = args;

        // Build a query object based on filter
        const query = {};
        if (filter) {
          if (filter.status) {
            query.status = filter.status;
          }
          if (filter.dueDate) {
            query.dueDate = filter.dueDate;
          }
        }

        // Build a sort object based on sort
        const sortOptions = {};
        if (sort) {
          if (sort.field) {
            sortOptions[sort.field] = sort.order === 'ASC' ? 1 : -1;
          }
        }

        // Find tasks from database using query and sort options
        const tasks = await db.Task.find(query).sort(sortOptions);

        // Return only the first limit tasks if limit is specified
        return limit ? tasks.slice(0, limit) : tasks;
      } catch (err) {
        // Log the error and throw an ApolloError
        console.error(err);
        throw new ApolloError('Failed to fetch tasks', 'FETCH_ERROR');
      }
    },

    // Fetch a task by id
    task: async (parent, args, context) => {
      try {
        // Get the database connection from context
        const { db } = context;

        // Get the id argument from args
        const { id } = args;

        // Find a task from database by id
        const task = await db.Task.findById(id);

        // Return the task or null if not found
        return task;
      } catch (err) {
        // Log the error and throw an ApolloError
        console.error(err);
        throw new ApolloError('Failed to fetch task', 'FETCH_ERROR');
      }
    },
  },

  Mutation: {
    // Create a new task
    createTask: async (parent, args, context) => {
      try {
        // Get the database connection from context
        const { db } = context;

        // Get the input argument from args
        const { input } = args;

        // Create a new task instance using input
        const task = new db.Task(input);

        // Save the task to database
        await task.save();

        // Return the task
        return task;
      } catch (err) {
        // Log the error and throw an ApolloError
        console.error(err);
        throw new ApolloError('Failed to create task', 'CREATE_ERROR');
      }
    },

    // Update an existing task
    updateTask: async (parent, args, context) => {
      try {
        // Get the database connection from context
        const { db } = context;

        // Get the id and input arguments from args
        const { id, input } = args;

        // Find and update a task from database by id using input
        const task = await db.Task.findByIdAndUpdate(id, input, {
          new: true,
        });

        // Return the updated task or null if not found
        return task;
      } catch (err) {
        // Log the error and throw an ApolloError
        console.error(err);
        throw new ApolloError('Failed to update task', 'UPDATE_ERROR');
      }
    },

    // Delete an existing task
    deleteTask: async (parent, args, context) => {
      try {
        // Get the database connection from context
        const { db } = context;

        // Get the id argument from args
        const { id } = args;

        // Delete a task from database by id
        const result = await db.Task.deleteOne({ _id: id });

        // Return true if deleted or false if not found
        return result.deletedCount > 0;
      } catch (err) {
        // Log the error and throw an ApolloError
        console.error(err);
        throw new ApolloError('Failed to delete task', 'DELETE_ERROR');
      }
    },
  },
};

export default resolvers;
Testing the App
Using Postman or Insomnia for Testing
To ensure that our app functions as expected, we need to test it thoroughly. Tools like Postman and Insomnia come in handy for testing GraphQL APIs. These tools allow us to send queries and mutations to our server and inspect the responses. We can also set up different environments, store variables, and even automate our tests with these tools.
Conclusion
By now, you should have a solid understanding of GraphQL and how to use it to build a real-world application. You’ve learned about GraphQL’s core concepts, set up a development environment, defined a schema, connected to a database, implemented resolvers, and tested your app. Most importantly, you’ve built a functional todo app from scratch, gaining valuable hands-on experience with GraphQL. Thank you for joining me on this journey through the world of GraphQL. I hope this guide has been informative and encouraging.